

This recipe is one of those which makes me recall when I was little. This is the first reason I love it; the second reason is because it is absolutely delicious! When my parents were young and starting to build their home, they had to be very shrewd with money, and my mom had to select groceries very carefully so as not to spend too much. Plus, as many other children, my brother and I were not big fans of meat, so she had to reconcile two issues: 1) make sure that her kiddos would eat meat and 2) spend the least amount of money she could. These beef rolls were her (absolutely scrumptious) solution. Not only kids, but all of your family and guests will love them, plus they also are super easy to make and inexpensive. The crunchy outside of the roll hides a melted cheese heart and a light taste of ham. Hard to believe that such a “poor” dish, can have such a symposium of tastes!
INGREDIENTS for 6 rolls:
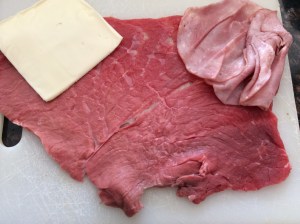
6 slices beef top round, extra thin cut for milanesa
12 slices smoked ham
6 Swiss cheese singles
1 cup plain breadcrumbs
1 beaten egg
Vegetable oil (to fry)
sea salt to taste
DIRECTIONS:
For each roll, spread a slice of beef on a chopping board.
Along one edge of the beef slice, arrange 2 slices of ham, overlapping each other as shown. Then place 1 cheese single, folded in thirds, on top of the ham. Fold the ham around the cheese (top and bottom, then each side). Be sure to fold the ham around the cheese very well to avoid gaps where the cheese could seep out of the roll during the frying phase. Flip the ham and cheese pocket over so the folded edges face down, to help keep it from coming open.

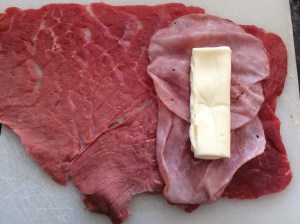

Now wrap the ham and cheese pocket with the slice of beef, tucking in the top and bottom edge of the beef slice as you roll. When you have the ham pocket covered completely, cut off the surplus (you could use it later, for a delicious Bistecca alla Milanese).


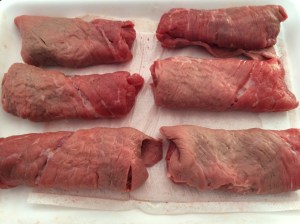
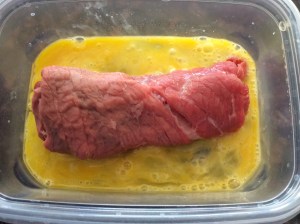
Once you have all your rolls done, dredge with the beaten egg and then breadcrumbs, coating evenly.


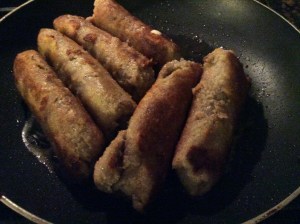
Fry each side of the rolls in a greased pan, until they become golden all around.


Salt the rolls, and serve immediately to get the best result, crunchy outside and melted inside.
LEARNT IT, MADE IT, LOVED IT!
TIPS:
– If you are planning to make the rolls for dinner, you can prepare them in the morning, and keep them refrigerated until dinner time, so you just have to fry them before serving.
– Since I try to eat the least processed food I can, I use plain breadcrumbs made out of baked bread. To see how I make them, click here.
– The perfect side dish to these rolls, for sure would be fries, but considering that they are pretty rich (in taste and calories), I suggest serving them with a “light” side dish, like a mix of boiled carrots, peas and potatoes.
I really hope you like this recipe, and please, if you do,
share it, like it, leave a comment and subscribe to receive a new recipe each week for free,
and help support my blog!
Much thanks,
Silvia

I made this recipe one by one and I did it, my friends who came to dinner liked it very much but thank you very much
LikeLiked by 1 person
Yay! I adore when my readers try my recipes!!! I am so happy you and your guests enjoyed it and thank you so much for your positive feedback!
LikeLike
This looks delicious!! Hope you don’t mind but I shared this to my regular PainPalsBlog feature “Monday Magic – Inspiring Blogs for You!”, Claire x
LikeLiked by 1 person
Please Claire! Go ahead! Such an honor ☺️!
LikeLiked by 1 person