
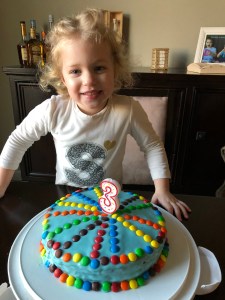
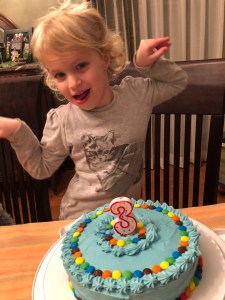
 I am such a bad blogger (even if I wish I had the persistency of writing all my recipes and ideas of good posts regularly) disappearing for months and then coming back (not to find excuses but with three little daughters and a fourth on the way – I’m due at the end of March – it is pretty easy to get lost into the daily routine), and especially in January when it should be the time for good year resolutions and great recipes, my focus instead is struggling with one big challenge: find the PERFECT – EASY – PRETTY birthday cake to celebrate my princesses. My youngest turned 3 on January 28th, my middle one will turn 5 on February 23rd. Not to sound picky or uptown but I hate common sponge cakes, not to mention those coming out of boxes, but I understand that they are the easiest and fastest way to make good looking decorated cakes for kiddos’ birthday party. Well, this year I believe I found the most perfect chocolate sponge cake recipe I’ve ever tried, and of course I have to share the recipe with you! This cake has a lovely moist consistency (you could eat it even without filling, just with a drizzle of cocoa or powdered sugar for a yummy afternoon snack), it takes a very small amount of ingredients (so if you exceed with the toppings you will feel anyway less guilty 🙂 ), and it is ready (including preparation and baking time) in not more that 45 minutes (let me be completely honest: frosting and filling require a coupe of hours ahead preparation). I found the recipe on Pinterest (for the original recipe click here) I experimented it twice, and picked different fillings and toppings, and everyone totally loved them both, not to mentioned that my daughter was pretty happy with the result since she was hoping for a blue chocolate cake with M & Ms, and filled with Nutella cream.
INGREDIENTS for a 9″ (22 cm) round cake
1 cup or 8 oz. all purpose flour (150 gr.)
3 separated eggs*
2/3 cup granulated white sugar (150 gr.)
2/3 cup whole milk, I used 2% and worked anyway (150 ml.)
4 tbs. unsweetened cocoa (35 gr.)
9 tbs. unsalted melted butter (80 gr.)
1 tbs. baking powder (16 gr.)
1 tbs. vanilla extract
milk, to dampen the cake before filling it
FOR THE FILLING
4/5 full tbs. Nutella (200 gr.)
2/3 cup heavy whipping cream (150 gr.)
FOR THE TOPPING
10 oz. chopped white chocolate (300 gr.)
2/3 cup heavy whipping cream (150 gr.)
Directions for the Filling (Nutella Cream)
Whip the heavy whipping cream very well. Melt the Nutella in the microwave for about 30 seconds. Add the whipped cream to the Nutella stirring gently, trying not to make the mix liquid and let it rest in the fridge for at list one hour. I have to precise that this cream is totally different from the one mentioned in the Pinterest recipe I used for the cake, because I thought that adding sugar, eggs and mascarpone cheese to the Nutella would have made the cream nauseating (but, of course, this is just my humble opinion).
For the topping (White Chocolate Ganache)
As you already could imagine, even If the request for the cake was a “blue one” I had no intention to buy the “boxed” icing or frosting (which is very popular here in US). Since my daughter doesn’t like butter frosting, I opted for a white chocolate ganache, made by following my instinct after surfing and reading many recipes on line. Since I made the cake two times, the first time I melted the white chocolate by double boing it, and mixed the heavy cream as it was without whipping it. It takes few minutes to melt, and it turned out very shiny but a little too liquid, even if I let the ganache rest in the refrigerator overnight. I added the edible blue die before to frost the cake and unfortunately I had to struggle to make the M&M keep their spots while I decorating the cake. The second time, I double boiled the chocolate and add the whipped cream to the melted chocolate, a little a time, trying to keep the cream fluffy. I let it rest in the refrigerator for about two hours, then add the edible blue die and it turn out perfectly compact (so ideal to add the M&Ms) but not shiny (no mirror or fondant effect).
For the cake
Melt the butter and set it aside to cool off. With the electric whip, whip the eggs white until stiff and set aside. Whip the egg yolks with the sugar until shiny and fluffy, then add the milk and vanilla extract and keep whipping. Then add the sifted flour and baking powder and keep whipping. Add the cocoa. And finally the cooled melted butter. Reheat the oven at 360 F. (180 C.), and while the oven warms up, add the egg whites to the batter stirring gently to avoid to make it liquid. Pour the batted in a greased 9″ round pan and bake it in the medium rack for 35 minutes (before to take the cake out, check with a stick if it is cooked). Do not overcooked otherwise the cake will be too dry. When the cake is fully cooled off, cut it in two or three layer, dampen the layers with milk to keep them moist, spread the Nutella filling in each layer (not on top of the last one). Cover the cake with the white chocolate ganache and decorate it according to your taste. 
Keep your cake refrigerated until is time to serve it and enjoy! I hope you will love this cake as much as my kids and their friends did!!!
LEARNT IT, MADE IT, LOVED IT!
I really hope you like this recipe, and please, if you do,
share it, like it, leave a comment, and subscribe to receive a new recipe each week for free,
and help support my blog!
Much thanks,
Silvia
TIPS: – *As already mentioned, I made this cake twice: first time following the original recipe that doesn’t required to separate the eggs, and honestly, the cake didn’t raise as much as I wanted. Second time I separated the eggs and whip the whites until stiff and the cake was PERFERCT to be cut in two high or three less thick layers.
– Another characteristic of this cake that I really liked is that you can prepare it in advance, it is rather better tasting the day after!
